Showing posts with label closet. Show all posts

Wednesday, February 1, 2012

Storage War

I have too many things in my various closets to pretend to be living a sartorially streamlined life. I am working on it, however. Periodically I hone in on a certain closet or a certain type of clothing, say sleepwear or bed linen, and then try and trim the fat. I find that I'm less and less able to donate or throw out things, simply because I have held onto them for so long, that throwing them out now seems like the wrong decision!
That said, I have too many belts and what's worse, I don't have a good storage solution. It's worse because the line between a hoarder and a curator of a well edited wardrobe is organization and clever storage.
{the problem}
My belt storage solution has been driving me nuts. It's hideous to look at, hidden at the bottom of my coat closet and bulging at the seams. It consists of a cheap, nylon Ikea catch-all basket. Totally not fit for purpose, no longevity or visual appeal whatsoever.
What do you use for belt storage? Have you found any good organizers? I need something sturdy, sufficiently spacious, without taking up too much valuable closet real estate (ideally I would like separate dividers within a roll-out shallow drawer, but that is for the future home). Oh, I don't like hanging my belts. So what should I use? Recommendations most welcome!!

Tuesday, January 31, 2012

Susie Homemaker

Today I felt the itch of spring cleaning and organizing. Yesterday's post had me thinking about our bedroom armoire, specifically its disheveled and unappealing contents. Yeeshk! I did not feel like capturing that before...
Phase one only had two goals: 1. Prevent antique shelving from staining or snagging vintage and antique linen and 2. Be easy enough to achieve without major time or financial commitment.
{before}
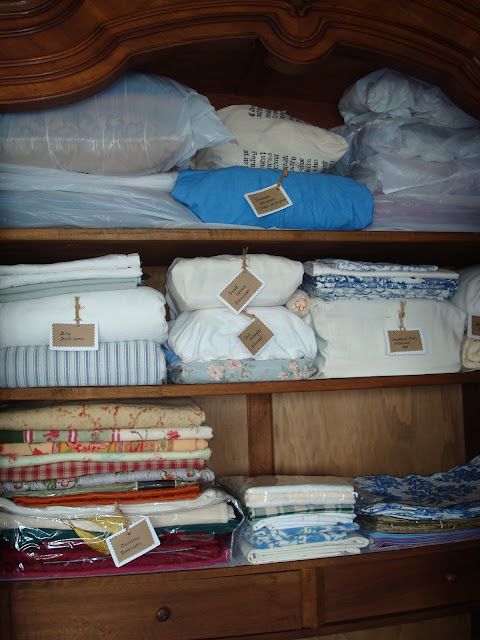
I dumped out the contents of the most offending shelves (the top shelf currently houses plastic and tissue paper wrapped needlepoint and seasonal cushions, which don't need further protecting for now) and went to get some contact paper. Of course,contact paper is not a long term solution, being that it is cheap, ugly, plastic-y and not in keeping with this armoir at all. I want to eventually line this armoire completely with thin cedar lining, so I can throw out all the lavender sachets, moth balls and cloves everywhere (I have become as moth prevention obsessed as my late mother, unfortunately only after the moth-fatality of a Burberry cashmere scarf...sigh).
Snip snip, stick stick and voila! somewhat improved surface for storing linen. I only removed a thin strip of the backing on each side, to avoid unnecessary (possibly damaging) adhesive to stick to the shelves when I want to go on to phase 2 (cedar lining).
{half-way} 
Although my contact-papering skills leave much to be desired, I did try to redeem myself in Martha Stewart's eyes, by stacking my bed linen according to size and type inside old/no longer used pillowcases. I'm also happily recycling the million plastic baggies from my LP deliveries and Ralph Lauren sheets. Zippered, clear storage pouches? Please, people pay money for those....
{still not quite perfect}
I delivered the final Susie Homemaker coup de grace, thanks to some packing-paper-on-index-cards-cut-out-with pinking-sheers-and-attached-with-jute-cord labels. Yessir. I is crafty.

{after}
Is there anything a pretty label doesn't improve?

Now the inside of the armoire will make me as happy as the outside! The drawers house fabric napkins, my zodiac crystal Val St. Lambert coasters and napkin rings.
Just to round out my feel-good Tuesday, I did my good Samaritan deed of the day by helping an octogenarian lady reach a bag of frozen Broccoli florets at the grocery store. That's what it's all about, isn't it?

Wednesday, January 25, 2012

Salt & Shoes

My beloved riding boots (before)
Salting season has begun and as city excursions call for more of a riding boot (sans thoroughbred) than duck boot, it is time to conduct the annual shoe maintenance.
Dry, scratched up and wrinkly boots in need of some TLC
To begin, take a pair of dirty/used leather shoes or boots, mink oil, some clean paper towels or rags.
Mink oil is essential for good leather maintenance
Mink oil looks white in the tin, is fairly odorless and has a lard-like texture. Most cobblers or shoe stores sell mink oil and a small $15 tin can last a lifetime, since you only need a small amount each time you do this. First, clean the boots or shoes with a damp cloth to remove any mud or salt already accumulated on the leather.
Damp boots without protective mink oil
Next, apply mink oil generously with a dry soft cloth. I used paper towels since I couldn't find my Loake shoe care kit (ahem...), but any clean cloth will do. You might even use ready-for-the-trash-cut-up-gym-t-shirts, if you're frugal like me. 
...generous dollop of mink oil....
..massaged into leather...
Massage the mink oil into the leather, using a circular motion and focusing on wear creases around the top of the foot and ankles. Fill any scratches in the leather with extra mink oil and then massage all over the entire boot until evenly coated. You will notice that the leather darkens slightly as it becomes moisturized and saturated with minky goodness. Don't worry, with wear this lightens up again. Repeat on second shoe.
Mink oil saturated leather
Pause, admire handiwork, swear you were a cobbler in a previous life and then...
Take a clean cloth, wipe off any excess grease and proceed to polish in a rapid back and forth motion. I find it easiest to wear the boots at that point, to stabilize and fill out. The finished result is a beautiful buffed sheen which is waterproof and ready for the saltiest winter roads and wet weather, hurray!
Boots ready for the winter

This pair is ready for navy skinny jeans, Petit Bateau stripey sailor top and navy Barbour Liddesdale. Now please excuse me while I repeat this process with my other 234,902,390 pairs of shoes. Tip jar's over there.